Lamp Flasher Circuit Using Two Relays

Figure 1. The Assembled Hamuro Lamp Flasher Circuit Using Two Relays
Lamp Flasher Circuit
Lamp flasher circuit is an electronic device that control a lamp to flash in periodic manner. Lamp flasher can be designed using semiconductor or other active components. Here we use two relays as the active components, plus some other passive components. Relay can be considered as an active component since it receives small power input to control higher output power. In electronics term, an active components is an electronic component that is able to amplify. You can say that we just need to supply about 50 mA current to produce 5A or more current. It doesn’t mean producing more energy from nothing, but it actually only controls other power source by switching on or switching off. I designed this circuit based on the idea of sawtooth signal generator circuit which is usually built using SCR, but here we replace the SCR with a relay. To learn how this lamp flasher circuit work, let’s first see the schematic diagram of the circuit below.
The Schematic Diagram
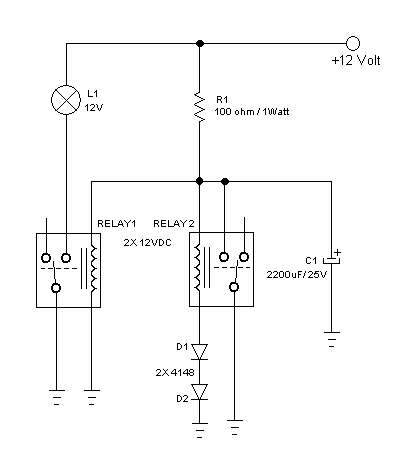
Figure 2. Hamuro Lamp Flasher Circuit Using Two Relays Schematic Diagram
The circuit is built using two relays, two diodes, one capacitor, and one resistor. The rest is the controlled lamp. At non powered condition, before the power supply is connected, both relays are off. When the power supply is connected, the capacitor is charged through the resistor and the voltage is increased gradually. At some point, the RELAY1 is activated first since it doesn’t have diodes in series, so its solenoid/coil receives higher voltage than the RELAY2s. The activation of the firs relay turns the lamp on, and the voltage of capacitor is continually increasing. After some point then the second relay is activated and short the capacitor to ground. Shorting this capacitor cause the voltage drops quickly, both relays are deactivated, the lamp is turned off, and the circuit repeats the charging cycle just like as the first time the power is connected.
How to Select R1 Resistor
The resistor R1 is important for the timing of the flashing cycle, but we select the value based on possible maximum value to enable smaller capacitor for cost efficiency. First we have to understand that any relays is designed with tolerance regarding the specified working voltage, so a 12V relay will be activated several volts below 12V. By using a variable voltage power supply, we can find lowest activation voltage of the relay. Our experiment show a 6V level for our 12V relays, let denote this level (6V) as UR. The second step is finding the internal resistance of the relay’s solenoid, just by measuring the relay by Ohm meter, and we find the resistance is 400 Ohm. Since we use two relays in parallel, then this resistance is a half of 400 Ohm = 200 Ohm, lets denote this resistance as RL. R1 is selected so that the voltage generated by the voltage divider arrangement of R1 and RL provides sufficient voltage to activate the second relay (since it has series diodes). The diodes is neglected in the resistance computation but it’s okay for approximation. The diodes add the activation voltage by approximately 1.5V, and for reliability we can add 0.5V again to make sure the relay is always get activated. So we can formulate:
RL/(R1+RL) * US = UR + 2V;
200/(R1 + 200) * 12V = 10V;
R1 = 100 Ohm;
After R1 has been selected, now you can make experiments with the capacitor to get suitable timing for your need. If you need to flash power line bulbs, you can use the RELAY2 contacts to control high voltage safely since its contacts is isolated from 12V circuit. Watch our video at our channel on Youtube and good luck!
Am impressed with your work and I feel to construct it too. Any advice 4 me🙋 please?
But why do I see two capacitors in the display. While there’s only one capacitor in the schm. Diagram?
Its just a parallel connection to achieve the specified value