High Side Current Sensing Using Transistor for Current Limiting Control
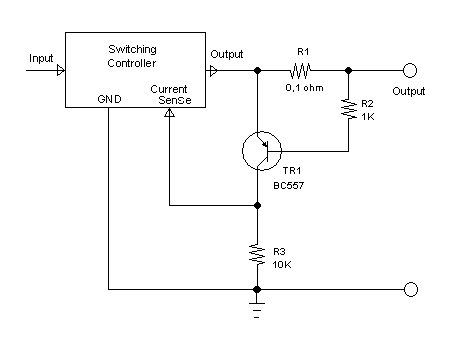
Figure 1. High Side Current Sensing Circuit Using Transistor Schematic Diagram
Introduction to Current Sensing
Current sensing is sometimes needed in a circuit to measure the amount of electric current flow. In signal communication for example, current sensing circuit is needed to read the measurement of remote sensor via current loop. Other common application is in the power supply circuit, when we need to limit the maximum current drawn by the load for safety, we need to measure or sense the current that flow to the load.
Resistance Current Sensing
Current sensing can be implemented using different ways such as resistance voltage drop, hall effect, or series transformer (for alternating current application). The simplest and the cheapest method is by routing the current via small resistor. A current that flow through a resistor will produce some voltage across the resistor, which is proportional to the current amount time the resistance. The resistance should be selected to have small enough to limit the maximum voltage drop at the maximum current, since a voltage drop means a power loss (power loss = current x voltage). It should be selected to be small enough in wasting the power, but it should be large enough to be read with acceptable precision.
High Side and Low Side Current Sense
The terms high side and low side refer to the insertion of the sensing element, whether inserted between positive supply and the load, or between the load and the negative supply (ground). The selection depends purely on the application that detect the sense current. At the time when both PNP and NPN transistors application got equal popularity, we might found equal number of equipments using positive and negative references. Today’s electronics, it looks like that NPN transistors and integrated circuits which uses negative potential as the ground reference becomes more popular. There are still some positive or high side references in some design, but they are mostly implemented for internal use, not for external input or output which is needed to communicate with external equipments or devices. We will even see that positive/high side current sensing circuit is needed to enable the negative common ground reference for external connection (input/output).
The Need for High Side Current Sense
When we designed buck and boost converters for our office’s power backup system using maintenance free lead acid battery, we found that the reference design described in the TL494 application report [1] uses low side current sensing to implement the current limiter. The problem is that we want to make 3 independent units of boost converters to provide 3 power outlets for three laptops or notebooks. We need three separated units since each laptop or notebook might have different voltage and current specs. It’s okay to have series resistor inserted in the low side of the internal converter circuitry to sense the current, but is means that the ground line for each outlet is not a common line, and we cannot mix them. It is safe if the notebooks are independently used, but unfortunately there are many chances that they are got interconnected, for example if we plug their audio outputs into one audio mixer which has common ground. Many sophisticated high side current sense designs using op-amps are available in literature, the Linear Technology Application Note [2] for example, but in this article, we present a solution using transistor which is simple and cheap.
The Circuit’s Schematic Diagram and How It Works
The figure 1. show the schematic diagram of the circuit. It consist only a small PNP transistor and three resistors. The current sensing element is R1 resistor. R2 is the current limiter for base emitter current. We need R2 to save the transistor since we use only small transistor keep the cost low, and there are no guarantee that the switching controller or any controller that we feed with the current information signal from the current sensing circuit will always be success in limiting current. The transistor begin conducting and producing the signal (that a high limit is reached) at R3 when the emitter-base voltage reach 0.6V level, so using R1 = 0.1 ohm means that it will give the signal at 6 Amperes. You can choose R1 (in ohm) values by 0.6 divide by the current limit. (in ampere). Note that the signal at R3 is not linear, we can assume that the level is zero before the load current reach the limit, and will be equal to output voltage when the load current reach the limit.
References:
[1] Designing Switching Regulators With The TL494, Texas Instruments Application Report, Texas Instruments, Dallas, 20011.
[2] Current Sense Circuits Collection, Linear Technology Application Notes, Linear Technology, 2005 .