Tutorial: ESP32 with ESP-IDF and C++ in Windows
Why ESP-IDF, C++, and Windows
First of all, choosing the ESP-IDF frameworks is the best choice in terms of complete supports for all ESP32 peripherals’s functionality, because it’s the official framework released by the chip’s maker (Espressif). This choice is very important for long term projects, where “investing in time” is unavoidable to manage many things.
Secondly, it might be my subjective preference in using C++ rather than C, especially when dealing with large codes to manage. The full object-oriented feature of C++ make it easier to organize the program structure. Based on my stressful experience in developing Deepstomp digital multi-effect stompbox platform which is coded in C, I think I have to switch to C++ for larger projects. However, it’s just my opinion and preference.
Lastly, I choose Windows because I use my Windows laptop as all-in-one working bench for daily usage. That’s my unlucky because I still depend on several software that works natively only on Windows. If you have no dependency with Windows, I recommend you to use Linux anyway. I have other computer running on Linux (not for daily usage) and it works better (even for the lower hardware specs than my Windows PC).
Regarding the C++ and Windows environment, fortunately, the pre-release ESP-IDF Version 4.0-Beta1 (by the time of this writing) support new build system that runs natively on Windows. Moreover, basically the compiler support C++ automatically when the source code file is in “.cpp” extension (not the “.c” extension). It would require some little tweaks to work properly.
Step 1: Installing ESP-IDF Development Tools for Windows
The easiest way to install all the needed tools for ESP32 application development in Windows is by downloading and running the following installer:
https://dl.espressif.com/dl/esp-idf-tools-setup-2.0.exe
The installer manage the installation of the cross-compilers, OpenOCD, cmake and Ninja build tool, and a configuration tool called mconf-idf. It also manage the downloading and installation for Python and Git For Windows if they are not available on your computer.
The installer would prompt for selecting the ESP-IDF version, just make sure to select version 4.0 or newer since the older version doesn’t support native build on Windows. Don’t worry about the installation path, you can choose the location of the development tools folder almost in any location. Once your development tools have been installed, you can create your application project in separate location. After creating a project, it would be compiled directly from its own location, independent of the development tool’s location. Refer the dcumentation here for more information about Windows tool-chain setup: https://docs.espressif.com/projects/esp-idf/en/v4.0-beta1/get-started/windows-setup.html
After the development tools have been installed, the only additional software is probably the source code editor. You can use eclipse’s code editor, programmer notepad, jen’s file editor, or even just a notepad would work. Let’s start to the step-by-step tutorial.
Step 2: Starting A New ESP32 Application Project
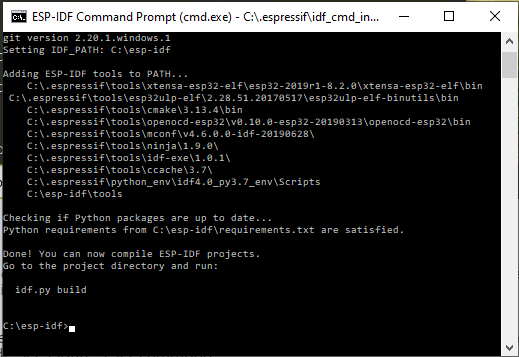
After installing the development tools, a shortcut to ESP-IDF command prompt should have been placed on the Windows start menu, like shown in the Figure 1. Click it to run the initialization of the command line environment, and it would look like shown in the Figure 2.

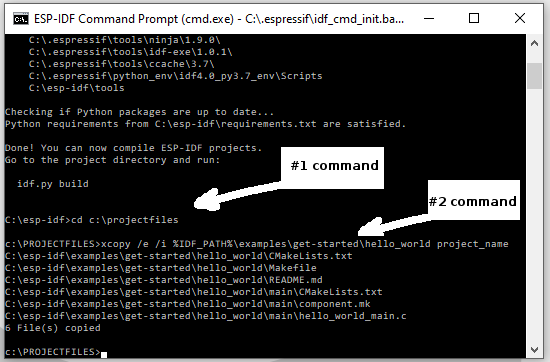
As you can see in the Figure 2, the working directory would be set to the ESP-IDF installation folder after the initialization is done. Now do the following steps:
- Change the working directory to your project folder (c:\projectfiles in the example, create it first if needed). See Figure 3, #1 command
- Copy the hello_world project from the idf installation path into a new folder (“project_name” in this example, please use appropriate name of your choice that describe your project). See Figure 3, #2 command.
Step 3. Renaming The Project and Converting Into C++
After copying the template files from hello_world into a new project folder (project_name), now you have to edit some files to convert it from C into C++. Use Windows file explorer to open the files with any text editor.
- Open “project_name\CMakeList.txt” file using any text editor and edit: change “project(hello-world)” into “project(project-name)”, save the file.
- Open “project_name\Makefile” file using any text editor and edit: “PROJECT_NAME := hello-world” into “PROJECT_NAME := project-name”, save the file.
- Open “project_name\main\CMakeList.txt” file using any text editor and edit: change “hello_world_main.c” into “main.cpp”, save the file.
- Rename the file “hello_world_main.c” in the folder “project_name\main\ ” into “main.cpp”.
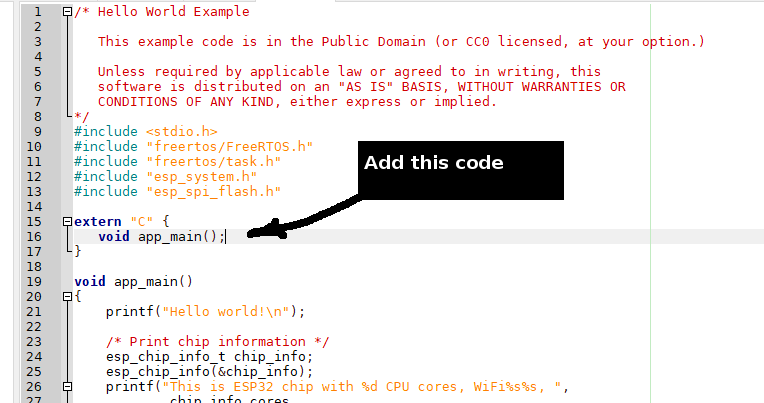
- Open “project_name\main\main.cpp” file using any text editor and edit: add the following statement extern “C” { void app_main(); } before void app_main() , see Figure 4, save the file.
Step 4: Configuring The Project
After editing some files in the step 3, now you can back to the ESP-IDF command prompt to configure the project. First, change the directory to the project_name folder, then run the idf.py menuconfig.
cd project_name
idf.py menuconfig
Project configuration application will be initialized and run, and you can configure many things such as the bootloader option, CPU frequency, security features, etc. To use the default configuration for all settings, you can just exit the application and save the config.
Step 5: Building The Project
To build the project into the executable binary, we just need to run the idf.py build command. The default option for build process will generate the both bootloader, partition table, and the application binaries. To do this, run the following command:
idf.py buildIf the build process doesn’t produce error then the binaries will be produced in the build folder.
Step 6: Flashing The Binaries
Before flashing to the ESP32 board, make sure the board is connected and the port is detected. To flash the binaries onto your ESP32 board connected to COM3 port at 115200 baud rate, you can use the following command:
idf.py -p COM3 -b 115200 flashJust change the port identifier according to the detected hardware. Please note this flash command of idf.py would automatically run the build first, so you can actually skip the build process (step 5). If there are no problem in the flashing process, the module will be reset and the “hello_world” application will run. You can monitor the output using idf.py monitor:
idf.py -p COM3 -b 115200 monitorStep 7: Adding Multiple File Source Codes to The Project
It is known as the best practice in C++ coding, that we separate some source code files into several module or library for easier management. The build system of ESP-IDF introduces the concept of component to manage the source code. For the simplest organization, we can add some source code files inside the main sub-directory of the project_name directory.
For example, let’s separate the chip information printing function into a C++ class in separate source code file. First, create new file named “systeminfo.cpp” and “systeminfo.h” in the main folder (in the same folder with the already exist main.cpp). Next, edit the “systeminfo.h” for some includes and class prototype as the following:
|
1 2 3 4 5 6 7 8 9 10 11 12 13 14 15 16 |
#ifndef SYSTEMINFO_H_ #define SYSTEMINFO_H_ #include <stdio.h> #include "esp_system.h" #include "esp_spi_flash.h" class esp_systeminfo { private: esp_chip_info_t chip_info; public: void print(); }; #endif |
Next, edit the “systeminfo.cpp” file to add the following lines:
|
1 2 3 4 5 6 7 8 9 10 11 12 13 |
#include "systeminfo.h" void esp_systeminfo::print() { esp_chip_info(&chip_info); printf("This is ESP32 chip with %d CPU cores, WiFi%s%s, ", chip_info.cores, (chip_info.features & CHIP_FEATURE_BT) ? "/BT" : "", (chip_info.features & CHIP_FEATURE_BLE) ? "/BLE" : ""); printf("silicon revision %d, ", chip_info.revision); printf("%dMB %s flash\n", spi_flash_get_chip_size() / (1024 * 1024), (chip_info.features & CHIP_FEATURE_EMB_FLASH) ? "embedded" : "external"); } |
Next, edit the “main.cpp” file by deleting the chip_info printing statements and replace the with the new object of the esp_system class, so the final codes looks like the following:
|
1 2 3 4 5 6 7 8 9 10 11 12 13 14 15 16 17 18 19 20 21 22 23 24 25 26 27 28 29 30 31 32 33 |
/* Hello World Example This example code is in the Public Domain (or CC0 licensed, at your option.) Unless required by applicable law or agreed to in writing, this software is distributed on an "AS IS" BASIS, WITHOUT WARRANTIES OR CONDITIONS OF ANY KIND, either express or implied. */ #include <stdio.h> #include "freertos/FreeRTOS.h" #include "freertos/task.h" #include "systeminfo.h" extern "C" { void app_main(); } void app_main() { printf("Hello world!\n"); /* Print chip information */ esp_systeminfo info; info.print(); for (int i = 10; i >= 0; i--) { printf("Restarting in %d seconds...\n", i); vTaskDelay(1000 / portTICK_PERIOD_MS); } printf("Restarting now.\n"); fflush(stdout); esp_restart(); } |
Next, edit the “CMakeList.txt” file in the main folder (the same folder with the “main.cpp” file) to include the newly created source code as the following
idf_component_register(SRCS "main.cpp" "systeminfo.cpp"
                    INCLUDE_DIRS "")
You can see it originally contain only “main.cpp” after SRCS, now you can add another cpp files (“systeminfo.cpp” in this example). Just separate the double-quoted file names with space for multiple cpp files.
Finally, make sure to save all the edited files, and now you can build (step 5) and flash (step 6) the program to the ESP32 board. If everything is OK then the hello world application will be running, same output but with different source code structure, C++ class! Don’t hesitate to comment in the comment section below for any discussion, and don’t forget to share this tutorial if you find it useful! Happy coding and good luck!
Hi Sir, Thank you so much for the introduction into moving on with the sample code and converting it into the
an ESP-IDF project . It was useful for me in converting my Arduino project running on ESP32 into esp-idf ,though it is not successful yet.
Hoping to see the continuation of your teaching article above as for the beginner like me it had shed some light in the making of the first few steps in the esp-idf.
Thanks for the post, it’s really helped get me started with my ESP32 board but in VSCode rather than the Arduino IDE.
There’s issues with the code above though, there’s HTML entities i.e. ‘#include <stdio.h>’ that might confuse some people.
That’s not HTML that’s C/ C+ + Header Definition.
Helpful how-to, thanks!
booleanBoy was referring to the occurrences of:
#include & l t ; stdio.h>
in the source code
Great tutorial! I come from the Arduino IDE and want to switch to using the ESP-IDF environment. There are many snippets of code available for this environment, which is good. But….they are in C, which I don’t master. Now I see a way to start coding under ESP-IDF in C++ and use snippets from both worlds!
../main/systeminfo.h:17:2: error: expected ‘;’ after class definition
../main/systeminfo.h:3:1: error: expected end of ifdefine: #endif
But this tutorial is great !
Thanks for pointing out the error, now its been fixed!