II.3.9. Adding MIDI Interface
Before writing Blackstomp sketch with MIDI support, we have to be aware that Blacktomp library doesn’t provide direct support for MIDI functions. As the consequence, we have to use third party library if we don’t want to write our own MIDI low level functions.
Installing MIDI Library
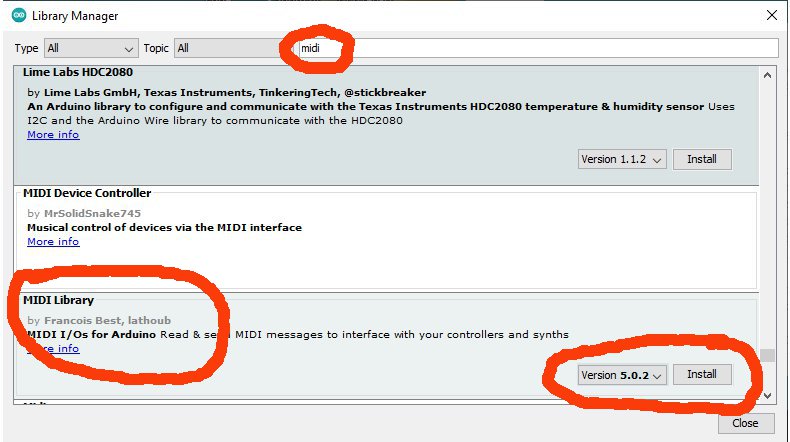
Before we can compile the example code “midipedal.ino”, we have to install the required library: “MIDI Library” (by Francois Best, Lathoub). Use the menu Tools > Manage Libraries, type “midi” in the search box and scroll the result to find the library and install it (See Figure 16).
Writing MIDI-Controlled and MIDI Controller Sketch with Blackstomp
To write a Blackstomp sketch with MIDI support using MIDI Library, we can follow these guidelines:
- Include <MIDI.h> on the top of codes.
- Call the function MIDI_CREATE_DEFAULT_INSTANCE() before defining the effectModule descendant class, so the MIDI variable will be accessible from all sketch sections.
- Create all the needed MIDI message handlers to handle the incoming MIDI messages.
- Create a MIDI task for setting up the MIDI, installing its handler, and listening the incoming messages. Run the task at core 0.
The following codes is the sketch example on how to write Blackstomp sketch with MIDI support. This sketch is available in the example folder of the Blackstomp library as “midipedal.ino”
|
1 2 3 4 5 6 7 8 9 10 11 12 13 14 15 16 17 18 19 20 21 22 23 24 25 26 27 28 29 30 31 32 33 34 35 36 37 38 39 40 41 42 43 44 45 46 47 48 49 50 51 52 53 54 55 56 57 58 59 60 61 62 63 64 65 66 67 68 69 70 71 72 73 74 75 76 77 78 79 80 81 82 83 84 85 86 87 88 89 90 91 92 93 94 95 96 97 98 99 100 101 102 103 104 105 106 107 108 109 110 111 112 113 114 115 116 117 118 119 120 121 122 123 124 125 126 127 128 129 130 131 132 133 134 135 136 137 138 139 140 141 142 143 144 145 146 147 148 149 150 151 152 153 154 155 156 157 158 159 160 161 162 163 164 165 166 167 168 169 170 171 |
#include <MIDI.h> #include "blackstomp.h" MIDI_CREATE_DEFAULT_INSTANCE(); class midiPedal:public effectModule { public: float gain; void init(); void deInit(); void onControlChange(int controlIndex); void onButtonChange(int buttonIndex); void process(float* inLeft, float* inRight, float* outLeft, float* outRight, int sampleCount); }; //////////////////////////////////////////////////////////////////////// void midiPedal::init() { //select the appropriate device by uncommenting one of the following two lines: //setDeviceType(DT_ESP32_A1S_AC101); setDeviceType(DT_ESP32_A1S_ES8388); //define your effect name name = "MIDI CONTROLLER"; //define the input mode (IM_LR or IM_LMIC) inputMode = IM_LR; /* PART OF MIDI CONTROL FUNCTION (0-11) * 0 Bank Select 0-127 MSB * 1 Modulation Wheel or Lever 0-127 MSB * 2 Breath Controller 0-127 MSB * 3 Undefined 0-127 MSB * 4 Foot Controller 0-127 MSB * 5 Portamento Time 0-127 MSB * 6 Data Entry MSB 0-127 MSB * 7 Channel Volume (formerly Main Volume) 0-127 MSB * 8 Balance 0-127 MSB * 9 Undefined 0-127 MSB * 10 Pan 0-127 MSB * 11 Expression Controller */ control[0].name = "Control Function"; control[0].mode = CM_POT; control[0].levelCount = 12; //(0-11) control[1].name = "Out Level"; control[1].mode = CM_POT; control[1].levelCount = 128; //(0-127) control[1].slowSpeed = true; control[2].name = "Channel"; control[2].mode = CM_POT; control[2].levelCount = 16; //(0-15) //setup the buttons //main button button[0].mode = BM_TOGGLE; //do variable intitialization gain = 0; //do resource allocation (if needed).. //.. } //////////////////////////////////////////////////////////////////////// void midiPedal::deInit() { //do resource deallocation (if needed).. //.. } //////////////////////////////////////////////////////////////////////// void midiPedal::onControlChange(int controlIndex) { switch(controlIndex) { case 0: //control[0] { auxLed->blink(10,10,1,1,0); break; } case 1: { auxLed->blink(10,10,1,1,0); gain = (float)control[1].value/127.0; MIDI.sendControlChange(control[0].value,control[1].value,control[2].value+1); break; } case 2: { auxLed->blink(10,10,1,1,0); break; } } } void midiPedal::onButtonChange(int buttonIndex) { switch(buttonIndex) { case 0: { if(button[0].value) { analogBypass(false); mainLed->turnOn(); } else { analogBypass(true); mainLed->turnOff(); } break; } } } //////////////////////////////////////////////////////////////////////// void midiPedal::process(float* inLeft, float* inRight, float* outLeft, float* outRight, int sampleCount) { for(int i=0;i<sampleCount;i++) { outLeft[i]=inLeft[i] * gain; outRight[i]=inRight[i] * gain; } } //declare an instance of your effect module midiPedal myPedal; void handleControlChange(byte channel, byte controlNumber, byte controlValue) { if(channel==myPedal.control[2].value+1) { if(controlNumber==myPedal.control[0].value) { myPedal.auxLed->blink(10,10,1,1,0); myPedal.gain = (float)controlValue/127.0; } } } //create MIDI task to handle the MIDI input stream on core 0, //so we can dedicate core 1 for signal processing void midiTask(void* arg) { MIDI.begin(MIDI_CHANNEL_OMNI); MIDI.setHandleControlChange(handleControlChange); while(true) { MIDI.read(); vTaskDelay(1); } } //setup the effect modules by calling blackstompSetup() inside arduino core's setup() void setup() { //SETTING UP THE EFFECT MODULE blackstompSetup(&myPedal); //start the MIDI input processing task on core 0 xTaskCreatePinnedToCore(midiTask, "midiTask",4096,NULL,9,NULL,0); } //do repetitive task here (for debugging info only) void loop() { } |
As shown in the example codes, the class definition is done after calling the macro function MIDI_CREATE_DEFAULT_INSTANCE() at line #4. The MIDI handler handleControlChange is implemented at line #128, and it should be done after the declaration of the effectModule instance (midiPedal myPedal; at line #126). This is important since the handler implementation should access the effectModule instance (myPedal). Note that unlike the usual intermediate variable, we have declared the member function gain in the public section (at line #8), not in private section. By placing it in public section, the gain variable is now accessible from outside the class, by the MIDI handler.
The MIDI task is implemented at line #143, doing the MIDI setup by calling the MIDI.begin() method, installing the MIDI handler handleControlChange, and run MIDI.read() indefinitely to read and process the incoming MIDI messages. The MIDI task is started to run on core 0 by calling the FreeRTOS API xTaskCreatePinnedToCore inside the Arduino’s setup function at line #160.
To run the sketch on the development mode pedal, don’t forget to turn the S.TTL/MIDI switcher to MIDI position after uploading the sketch to the pedal. The first knob would set the MIDI channel channel (1-16), the second knob controls the gain, and the third knob would set the MIDI control function (0-11). Use the auxiliary LED’s blinking to count the indicated position when turning the knob from all the way down position.
The pedal will function as both MIDI controller and MIDI-controlled device. As a MIDI controller, it send a continuous control command when we turn the gain knob. It becomes a converter of analog expression pedal to MIDI pedal when we plug an analog expression pedal into the EXP/CV input port. As a MIDI-controlled device, it will be a simple volume pedal that receive the MIDI signal from a MIDI expression pedal controller.