Programming The Lock Bits Using Arduino ISP with AVRDUDE
Intoduction: Protecting The Arduino Uploaded Program Codes
If you want to sell the final product developed with Arduino, then you need to protect the firmware from cloning. Similarly, you need the protection as well when selling an embedded software by selling the programmed microcontroller chip. Fortunately, there is a lock bits fuse that that is programmable using the ICSP interface. Programming this lock bit fuse prevent the reading of your codes from the flash memory. In order to program this protection, fortunately we can use ArduinoISP. An yes, this tool has already included in the Arduino software installation as ArduinoISP sketch. However, programming the microcontroller chip using ArduinoISP as the programmer is beyond the discussion. So, here I will just present the method on how to use it for programming the protection fuse bits.

Creating The Avrdude Lock Bit Protection Fuse Programming Setup Easily in Arduino
Every Ardunio development tool installation includes avrdude tools for uploading the sketch. Therefore, we need not to install a separate avrdude application. To experiment with this, I have tried this simple method in Windows operating system. However, I think the same method is applicable in Linux environment since they have equivalent shell script commands.
- Firstly, make sure that we have run an ArduinoISP sketch on the programming.
- Secondly, make sure we have set the verbose output mode for uploading in the Aduino development software. To do this, go to File->Preference, and in check the upload checkbox. You can find this check box in the option of “Show verbose output during: compilation, upload” in the Settings tab.
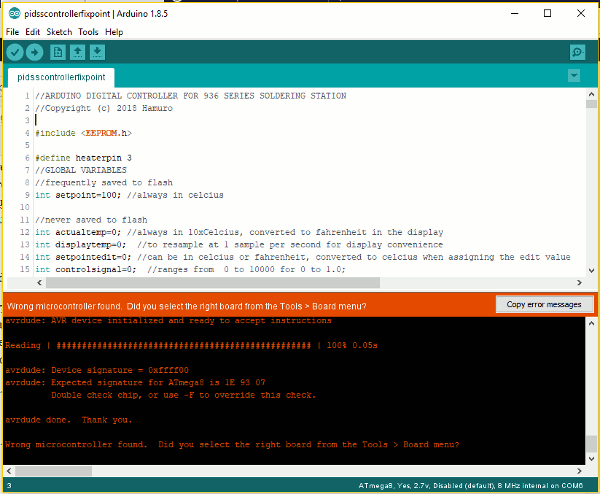
- Next, upload the application sketch to the application board by menu Sketch->Upload Using Programmer (Ctrl+shift+U), but wit the target (application) board disconnectedor powered-off. This trick will force the Arduino interface to show a “copy error message” pop up. This menu will show up in the right-top-corner of the verbose output window (Figure 1). Without this error, all displayed message in the output terminal can’t copied to the OS’s clipboard.
- Open your sketch folder, and create new text file, save as “writelockbit.bat”. You might need to uncheck the “hide extension for known file type” of the file explorer or operating system’s preference to save as “.bat” or to edit/rename the extension from “.txt” to “.bat”.
- Edit the file “writelockbit.bat” (right click on the file name and select “edit”), then paste the error message. Search the avrdude command by search “avrdude” keyword. The search should find something like shown as the blue selection in the Figure 2.
- Delete all texts other than the avrdude command line, leaving the line as follows (in your system it might be different):[cc language=”cpp”]C:\Users\ACER\AppData\Local\Arduino15\packages\arduino\tools\avrdude\6.3.0-arduino9/bin/avrdude -CC:\Users\ACER\AppData\Local\Arduino15\packages\arduino\tools\avrdude\6.3.0-arduino9/etc/avrdude.conf -v -patmega8 -cstk500v1 -PCOM6 -b19200 -Uflash:w:C:\Users\ACER\AppData\Local\Temp\arduino_build_796890/pidsscontrollerfixpoint.ino.hex:i [/cc]That command runs the avrdude from its intallation path “…bin/avrdude” (it might be different in your system), with the -C option for config file “…/etc/avrdude.conf”, -v option for verbose output, -p option for themicrocontroller device (amtmega8), -c option for the programmer type (stk500v1), -P option for the port (COM6), -b option for the baudrate setting (19200), and -U option for the target memory to be read or write (flash) along with the hex file name that contain the codes to upload.
- Edit the command to change the target memory from “flash” to “lock”, change the uploaded code file into direct 1 byte immediate locking code 0x00 (other values can be chosen, see the ATMEGA microcontroller’s manual), and add -u option to disable safe-mode. Add additional new line of “pause” command to halt the execution, preventing auto exit after finishing the lock bits writing, so we can manually checking the response of the avrdude’s execution messages. The edited code now should look like the following:
[cc language=”cpp”]C:\Users\ACER\AppData\Local\Arduino15\packages\arduino\tools\avrdude\6.3.0-arduino9/bin/avrdude -CC:\Users\ACER\AppData\Local\Arduino15\packages\arduino\tools\avrdude\6.3.0-arduino9/etc/avrdude.conf -v -patmega8 -cstk500v1 -PCOM6 -b19200 -Ulock:w:0x00:m -u .
pause[/cc]
Save the “writelockbit.bat” file, and now you can execute the avrdude to program the lock bit fuse by double-clicking this “bat” file after uploading the sketch using the ArduinoISP. That’s all the steps to program the protection lock bits, preventing someone from cloning your application. However, please be aware that some some might break the protection with some hacking techniques. The techniques ranges from power or signal glitching to disrupt the internal fuse bit data transfer, laser beam injection that targets a specific point of the chip to manipulate the protection bit, to decapitating the chip to read the codes visually by observing the micro-structure of the semiconductor layers using optical or electron microscopes.
The assumption is, after securing by programming this protection fuse bits, the cost for stealing your codes by any hacking methods should be more expensive than hiring a programmer to reverse-engineer your system and write their own codes.